Step-by-Step Training
Step 2: Getting Started
Introduction
Wolfmart 360 is an online requisition tool. When you shop, items are routed through various stages: from shopping, through to any necessary approvals, the purchase order being sent to the supplier, the good/service being received, and then the account being payable to the supplier. Here's a sample workflow:Your profile in Wolfmart 360 allows you to set up basic information. To get started, log in and check your User Profile like this:
- Click the silhouette at the top right corner of the page

- Select View My Profile.

- On the left, select User's Name, Phone Number, Email, etc.; ensure everything is accurate and click Save.
- Click the silhouette at the top right corner of the page
All orders go through central receiving unless the ship-to location is off-site or desktop delivery (see below for off-site locations). Rather than adding information to each order, you can set a default address in your profile.
Set Your Default Address
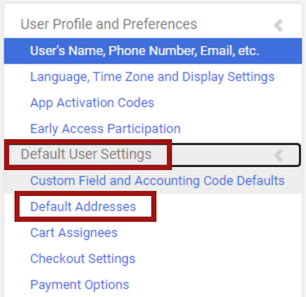
- Access your profile
- Select Default User Settings
- Select Default Addresses
- Click Select Addresses for Profile

- In the search box, type Central Receiving if you are on West Campus or HSC. If you are offsite, input your address.
- Select the address, and input your information in the designated lines. Don't worry
about your specific building or room number- you will update that in a different section.
Make sure that the box next to Default is selected before saving
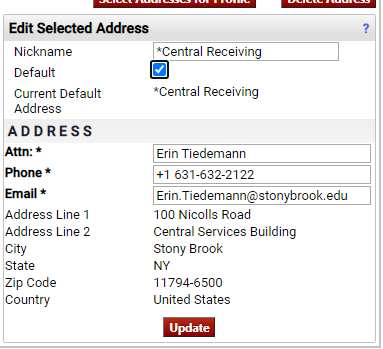
- Click Update
Set Your Default Building/Room
- Access your profile
- Select Default User Settings
- Select Custom Field and Accounting Code Defaults
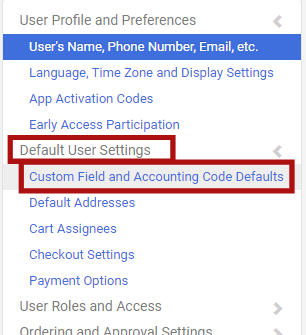
- In the tabs at the top, click Account Code Assignments

- In the list of Custom Field Names, find Building and click Edit to the right

- Click Create New Value
- In the Description box, type the building name and click Search
- Select the correct building and click Add Values
- The building name will display on the left. Click on the name, wait for the background
to turn red, and then check the Default box that appears on the right and click Update

- Click Close
- Click Edit to the right of Room

- Click Create New Value
- Type the room number in the Value box and click Search
- Select the correct room and click Add Values
- The room number will display on the left. Click on the number, wait for the background
to turn red, and then check the Default box that appears on the right and click Update

- Click Close
You can change the way you receive notifications in WolfMart 360.
- Access your profile
- On the left, select Notification Preferences
- Select the notification category you'd like to change: Administration & Integration;
Shopping, Carts & Requisitions; Purchase Orders; etc.
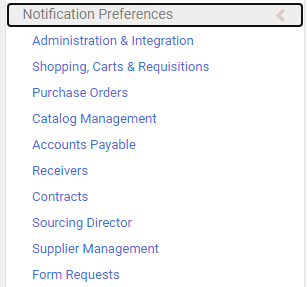
- Make sure you click Edit Section on the upper right hand side.

- For each setting you'd like to change, select Override and then select the desired
notification method

- At the bottom, click Save Changes
- Repeat steps 4-6 for additional notification types
There are 3 roles in Wolfmart 360: Shopper, Requester, and Approver. Your access depends on your role.
Because of these roles, a purchase may go through 3 people before officially becoming a Purchase Requisition.
Shopper Shoppers can shop. That is, create a shopping cart, but they can't actually check out that cart. In order to purchase something, they must assign the cart to a Requester or an Approver. Requester Requesters can do everything Shoppers can do but they can also complete the accounting information. Unless they are also an Approver, they must submit the cart to the Approver for final review. Approver Approvers can do everything Requesters and Shoppers can do, plus they are responsible for reviewing each line and rejecting any as needed. In some cases, Approvers can even modify current orders. The WolfMart home page has several sections
Toolbars
The left and top toolbars allow for easy access to WolfMart functions:
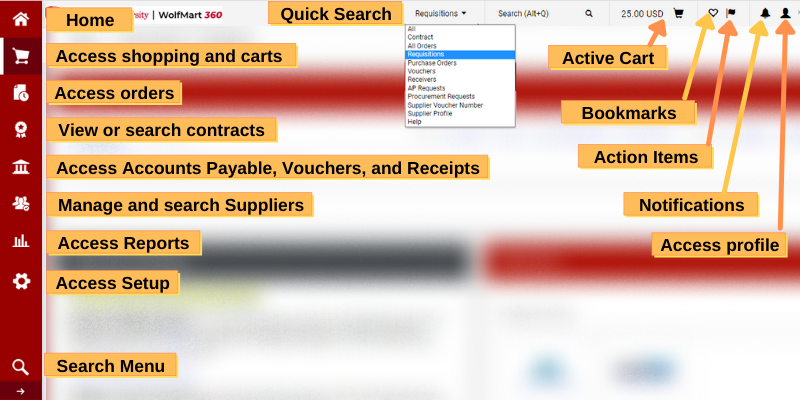
Showcases
The main homepage section shows different shopping options:

Including a search option:

News
Be sure to read our WolfMart 360 Message Board for the latest news, requirements and supplier updates!!
Help
Throughout Wolfmart, click ? icons for more information on that section, or click the "Search" link at the bottom of the left side navigation to add a keyword and search for additional information.
Shopping
Adding a Vendor/Supplier to WolfMart
About Vendors
To purchase from a vendor in WolfMart, the vendor must be in the system, meaning when you type the vendor name in the Supplier box, the vendor should appear below it:
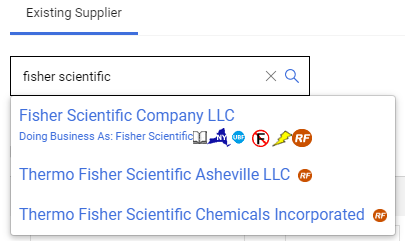
Also, the vendor must support the funds you use. That is, vendors that accept State funds display a blue NYS icon; Research Funds display an orange circle (see Fisher Scientific above).
Add a Vendor
If a vendor isn't in Wolfmart or doesn't accept your funds, you can request to add it by filling out a New Supplier Request Form.
Before filling out this form to request a new Supplier, please contact the Supplier to get the required information outlined:
- Confirm that the Suppliers accepts Purchase Orders. If the Supplier does not accept Purchase Orders, please contact the Procurement Office at 631-632-6010.
- For domestic Suppliers, please obtain a completed, recent, signed, and dated Substitute W9 form.
- For foreign Suppliers, please obtain a completed, recent, signed, and dated W8BEN (for an individual) or W8BEN-E form.
- For foreign Suppliers, please obtain a completed Foreign Vendor Registration Request form.
You can find detailed instructions on filling out the New Supplier Request form by clicking here.
Browsing Suppliers in Wolfmart
Many commonly used suppliers are listed on the homepage, but you can also browse all suppliers.
- Click on suppliers from the browse option at the top of the home page

- Click Click to expand Search for Supplier Filter

- In the Supplier box, type the supplier name and click Search
- Click on the correct supplier name. If the supplier name does not display, request to add it
- Click on suppliers from the browse option at the top of the home page
Ordering Radioactive Material
Radioactive material orders are processed as non-catalog items. As always with non-catalog items, be sure to add a shipping line.
Radioactive orders are routed through Grants and EH&S for approval and follow the steps for a non-catalog item and check the radioactive box.
Changes When Shopping: Fulfillment Center and Radioactive
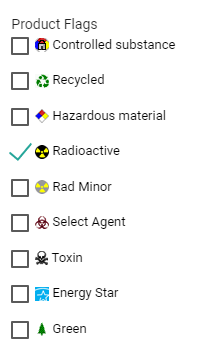
- In the non-catalog product options, check the box for Radioactive
- When you view your shopping cart, be sure you've addressed these 2 areas:
- Radioactive symbol
 (from checking the radioactive box)
 - Shipping line
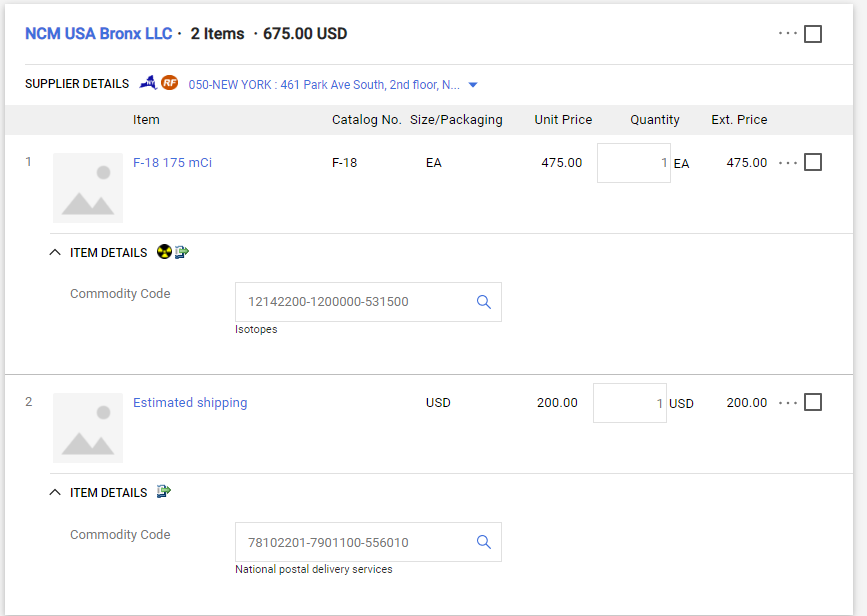
- Radioactive symbol
- In the non-catalog product options, check the box for Radioactive
Purchasing from Hosted Catalog Vendors
When purchasing through Hosted Catalog vendors, you search for the items directly in WolfMart 360.
Click on a Hosted Catalog vendor's name (you'll know a vendor is Hosted Catalog if a search box displays when you click on the vendor name, or when browsing suppliers, the Hosted Catalog icon displays
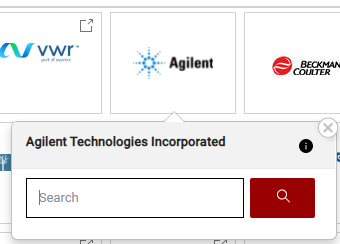
In the seach box that pop ups, type the part number or item name and click Search
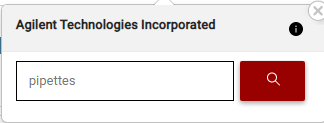
Alternatively, type the number or name in the Shop search box at the top of the page and click the magnifying glass or hit Enter. Keep in mind this search may display products from several different Suppliers.
Adjust the quantity as needed and click Add to Cart
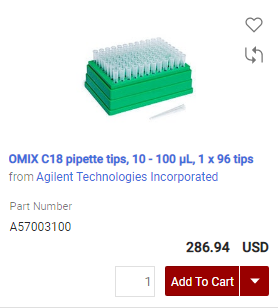
Add any other items then go to your cart by clicking the shopping cart icon at the top of the page and then click View My Cart
Note: For hosted catalog (and punch-out) purchases, do not add a shipping line
Continue with your order (click Assign Cart if you are a Shopper; click Proceed to Checkout if you are a Requester or Approver)
Purchasing from Punch-out Vendors
When purchasing through Punch-out vendors, you'll be redirected to their website, where you will create your cart, and then when you checkout of that website, you'll return to WolfMart. Back in WolfMart, the items added at the vendor's website will be in one WolfMart cart.
It's important to note that a single WolfMart cart cannot mix contract and non-contract items, so once back in WolfMart, be sure to check that your cart only has one type of item.
- On the home page, look at the Showcase. PunchOut suppliers will have a
 icon in the top right corner.
- If icon is there, click PunchOut to be directed to the vendor's website
Alternatively, if browsing suppliers, the icon indicates a punchout vendor
 - You will see this message on the screen, indicating the system is taking you to the
vendor's website. If you need to cancel the PunchOut for any reason, you can select
"Cancel PunchOut" in the top right corner of the window.

- Create your order at the vendor's website and click Checkout or Submit
(appearance/wording of vendor websites will differ)
- Note: For punch-out (and hosted catalog) purchases, do not add a shipping line
- If you need to move the items in your cart for any reason, avoid moving PunchOut items
from your active cart because this can lead to your order displaying an error.
- Continue with your order (click Assign Cart if you are a Shopper; click Proceed to Checkout if you are a Requester or Approver)
- On the home page, look at the Showcase. PunchOut suppliers will have a
Purchasing Non-Catalog Items
Before placing a non-catalog order, always search for the product using Shop search as this is the only way to ensure contract pricing. If you do not find the item, place the order as non-catalog as follows:
- Click non-catalog item from the Go to options on the home page.

- In the Non-Catalog Item pop up, enter the supplier by either typing the name and then
selecting from the options or clicking supplier search and selecting the vendor there (Add a missing vendor)
- Be sure the selected supplier supports your funds: State funds suppliers display a blue NYS icon; Research funds suppliers display
an orange circle.
- Complete fields as follows:
- Product Description: enter product name or description
- Catalog No: enter catalog #
- Quantity: enter how many units
- Price: enter price estimate (e.g., 20)
- Packaging: enter unit of measure
- Check off any relevant features (e.g., Recycled, Energy Star, Toxin)
-
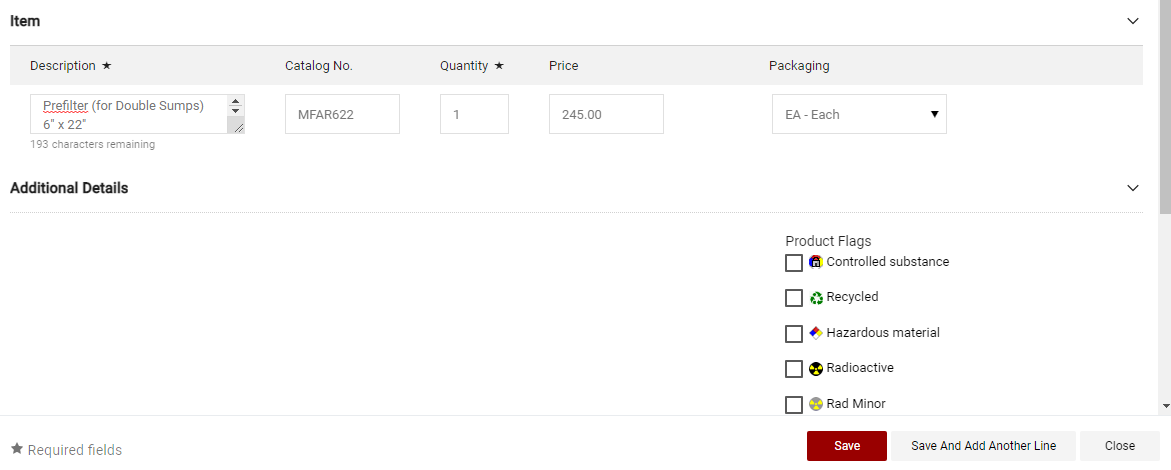
- Click Save and Add Another Line to add any additional items (up to a total of 39 items)
- When finished adding items, add a shipping line by clicking Save and Add Another
- For the Shipping line, complete the information as follows:
- For Product Description, type Estimated Shipping
- For Quantity, type 1
- For Price Estimate, type estimated shipping cost (e.g., 20)
- For Packaging, select USD - US Dollar
- For Commodity Code, click the magnifying glass to search, type National Post in the
Description contains box, click Filter, and click the blue + to the right of code
78102201-7901100-556010

- Click the shopping cart icon at the top of the page and click View My Cart
- Continue with your order (click Assign Cart if you are a Shopper; click Proceed to Checkout if you are a Requester or Approver)
- Click non-catalog item from the Go to options on the home page.
Searching for Products
You can search for a product, not necessarily from a specific vendor, using Shop Search.
Simple Search
Shop Search is near the top of the page. Simply type in the product you are looking for and click the magnifying glass.

Advanced Search
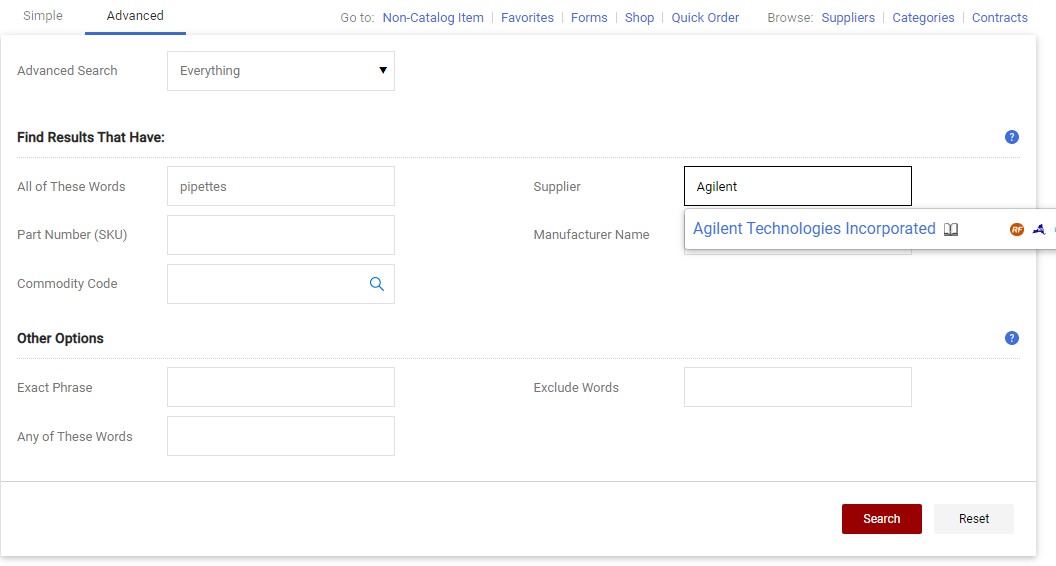
- To use Advanced search, select the Advanced tab next to Simple search:

- You can select a search category (instead of searching Everything):
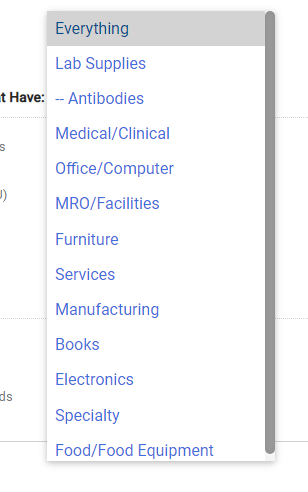
- Specify Supplier, part number, manufacturer name:
- Specify Supplier, part number, manufacturer name:
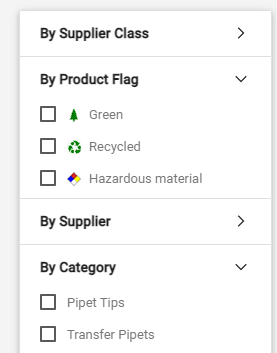
- Filter results by supplier, category, manufacturer. Click on one option (e.g., Applied
Biosystems) or click the filter button to filter by more than one:
- To use Advanced search, select the Advanced tab next to Simple search:
Understanding Commodity Codes
When ordering Non-Catalog items or using forms, you will need to input a commodity code for each item. While Hosted and Punchout orders automatically input these codes for you, for all other orders, you will need to refer to the Commodity Code Cheat Sheet in order to determine which code to use.
Non-Catalog Orders
- After adding your items to your cart, view your active cart
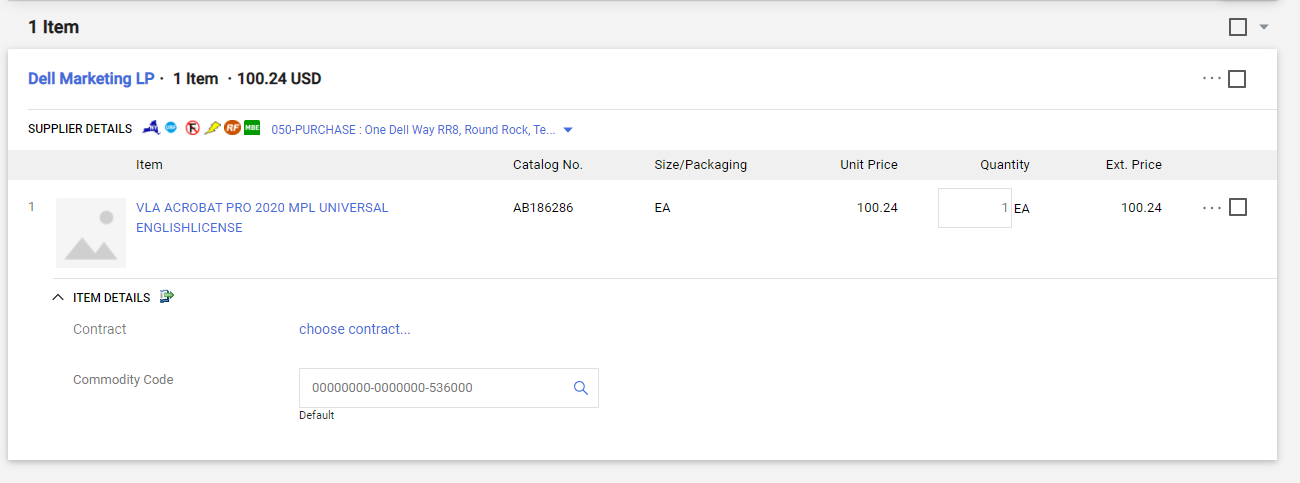
- Click on the blue magnifying glass to open up the search menu

- Search for the commodity code by either searching under Description using key words
from the item category
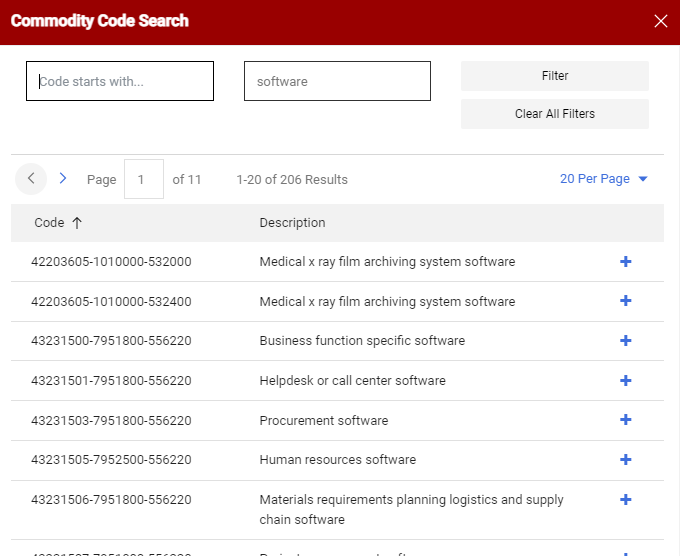
Or search under Code starts with... using the first 8 digits of the commodity code number, which can be found on the Commodity Code Cheat Sheet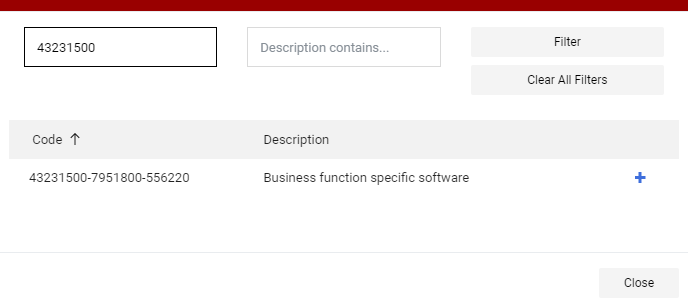
- Select the code by clicking the blue + symbol to the right of the code and it will
fill into the Commodity Code section. Proceed with the rest of your order

Form Orders
- To add a code on a form, go to the Commodity Code section and click search...

- Locate the commodity code by either searching under Description contains... using
key words or Code starts with... using the first 8 digits of the code, found in the
Commodity Code Cheat Sheet

- Choose the commodity by clicking select to the right of the code
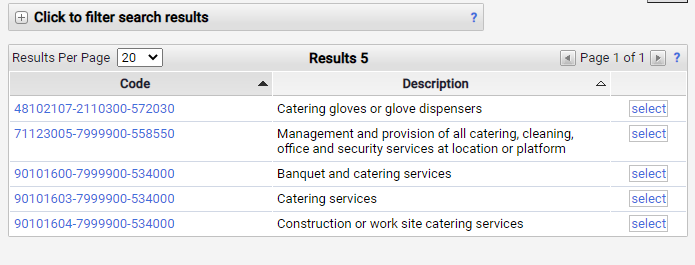
- The code will fill into the Commodity Code section, and you may proceed with the rest
of the form

For any questions regarding commodity codes, reach out to wolfmart_help@stonybrook.edu
- After adding your items to your cart, view your active cart
Check out
Overview of Checking Out
Once a shopping cart is complete, the next step is Check Out, which must be completed by a Requester or Approver. Those with Shopper access must first Assign the Cart, however if this is the first time in the Wolfmart System, please make sure you complete the ship to address for Central Receiving, if you work in HSC or West Campus. If you are off-site, such as in Southampton or Hauppauge, type in the city, then click search and select. Your name & email address will pop up. Please add your telephone # and make sure you save for future use. Your default address can be saved in your WolfMart profile.
When viewing a cart, Requesters and Approvers can simply click Proceed to Checkout.
When Checking out, there are several parts; each section under Draft delineates a specific step to be completed. Any sections that are linked in blue need attention. Simply click on the link to open the section:
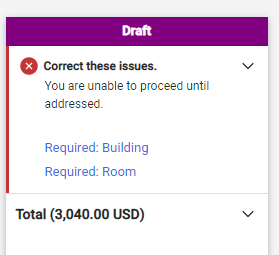
Check these areas in particular when checking out:
Checking out and Accounting Codes
Accessing Accounting Codes at Checkout
- While checking out, scroll down to Accounting Codes section
- In the section, click the pencil on the far right to edit

- Continue below for State or Research Funds
State Funds
- For Account Source, click the blue arrow to select from profile values...
- In the dropdown menu, choose S for State Funds
- Scroll to Fiscal YR-SUNY, click the blue arrow and then from the dropdown menu, choose
the appropriate fiscal year (do not type the year directly in the box--be sure to
select from the dropdown)
- Under Account-SUNY, click the blue arrow and choose the correct account
Split State Funds
- If you need to split funds with another State Account (you cannot split funds between
State and Research Accounts), click the + icon at the bottom right corner
- Near the right, select % of Price (for State funds, only choose % of Price). Make
sure it adds up to 100%
- For Account-SUNY in the new row, click the blue arrow and choose the account number
for the split (If you don't have access to the other split account, assign the cart
to the appropriate person who has access)
- Click Save
Research Funds
- For Account Source, click the blue arrow
- In the dropdown menu, choose R for Research
- For Project Number, click the blue arrow
- Select the desired account number
- For Task-RF, click the blue arrow and choose from the drop-down. If there is only
one task, it will automatically fill in.
- For Expenditure Major, click the blue arrow and choose SUP if Supplies from the dropdown.
For other orders, choose accordingly
- For Expenditure Minor, click Select from profile values and choose SUP Office Supplies
from the dropdown if office supplies. For other orders, choose accordingly
- Click Save
Split Research Funds
- If you need to split funds with another Research Account (you cannot split funds between
Research and State Accounts), click the + icon at the bottom right corner

- On the right, select the type of split (% of Price or % of Qty)
- For Project-RF in the new row, click the blue arrow and choose a different project
number for the split (If you don't have access to the other project number, assign
the cart to the appropriate person who has access)
- Complete Project, Task, and Award, and then click Save
- While checking out, scroll down to Accounting Codes section
Checking out and Final Review
- When checking out, you will notice a column on the right titled Draft. Here, it will
list what you need to input in order to place your order. To fix these issues, simply
click on each item.
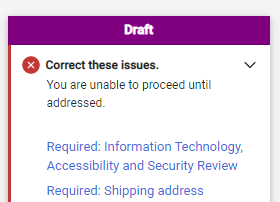
- For Information Technology, Accessibility and Security Review, click on the item.
- Select Yes if the purchase is an equipment purchase over $1500 or computer purchase
over $500; otherwise, select No
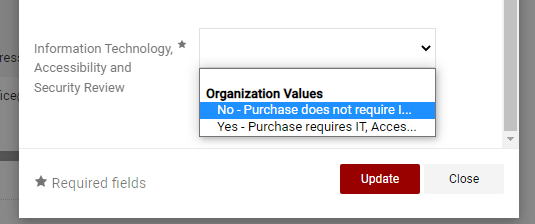
- Click Update
- For Information Technology, Accessibility and Security Review, click on the item.
- If there are any other issues, they will display under the Draft column. Address any
additional issues
- When there are no issues, continue by clicking Place Order (if you are a Requestor
or Approver) or Assign Cart (if you are a Shopper)
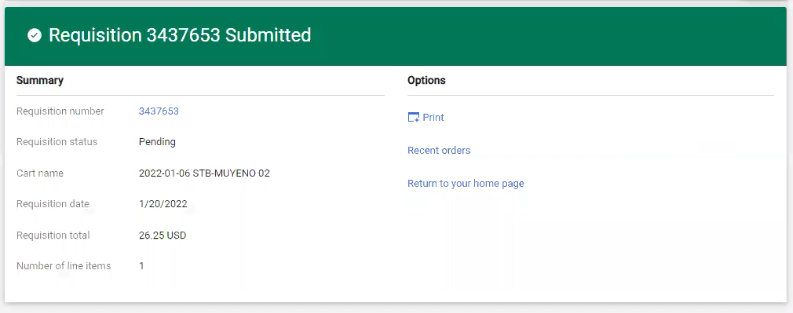
- Once you've submitted the requisition, you'll see a confirmation message including
summary information. For more, click the requisition number to view the Requisition
- When checking out, you will notice a column on the right titled Draft. Here, it will
list what you need to input in order to place your order. To fix these issues, simply
click on each item.
Checking out and Notes and Attachments
During checkout, you can add internal or external notes and attachments for Non Catalog and sometimes Form orders (if a Punch out vendor gives a quote, the order must be Non Catalog instead of Punch out).
Internal vs External Notes and Attachments
Use Internal Notes and Attachments
- To send specific information to the purchasing agent
- For Non Catalog orders over $2,500 for State; $10,000 for Research
Use External Notes and Attachments
- If the vendor supports External Notes and Attachments (you will be notified if they do not)
- For Non Catalog under $2,500 for State; $10,000 for Research
Accessing Internal and External Notes
- After proceeding to checkout, scroll down to the sections that say Internal Notes
and Attachment and External Notes and Attachments

- To add an Internal Note, in the Internal Notes and Attachments area, click the pencil
to the right, type your note, and click Update
- To add an Internal Attachment, click Add, type a name for the file, click Select Files...
to select the file from your computer, and then click Save Changes
- The External Notes and Attachments area will display an error if they are not supported
by the vendor
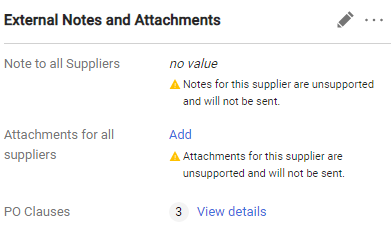
- If they are supported, to add an External Note, in the External Notes and Attachments
area, click the pencil to the right, type your note, and click Update
- To add an External Attachment, click Add, type a name for the file, click Select Files... to select the file from your computer, and then click Save Changes
Continue checking out with Final Review ➜ (Previous bullet point)
Checking out and Shipping
Once you Proceed to Checkout, you'll need to complete Ship To and Deliver To information.
In My Profile, you set your default Ship To and Deliver To addresses; you can also enter information, or override defaults, at checkout.
All orders (with the exception of off-site orders) go first to Central Receiving; desktop orders are then delivered to your building. Thus, for all but off-site deliveries, use Central Receiving as the Ship To address.
Ship To Address
- To the right of Shipping, click the pencil icon to edit

- In the Address Search box, type the name of the location (e.g., Central Receiving)
and click the magnifying glass to search
- Click the correct address and ensure the circle to the left is filled in
- Continue on to complete the Deliver To address
Deliver To Address
Use the Deliver To address to indicate where orders should go after Central Receiving. If you're using the default Building and Room from My Profile, you can skip these steps:
- In the shipping information at checkout, scroll down to Deliver To
- Under Building, type the building name (e.g., Ward Melville) and select the building
that appears in the dropdown
- Under Room, type the room number in the value box and click Search
If the room is in the HSC levels 1-9, enter the level before the room number with a dash between: for example, for level 5 room 123, enter 5-123. For level 10 or above, enter the level and the room number without the dash: for example, for level 11 room 543, enter 11543.
If you're using an offsite location, type N/A (in capital letters)
- Select the correct room number from the dropdown
Delivery Options
Freight Terms (e.g., shipping paid or due) need to be changed for vendors displaying a
 icon. You can also modify the Requested Delivery Date to a future date.
 - To the right of Delivery Options, click edit
- If the
 icon displays next to the vendor name, for Freight Terms, click the blue arrow and
choose Paid from the menu
- To modify the Requested Delivery Date, click the calendar icon and click the desired
future delivery date
- Click Save
- To the right of Shipping, click the pencil icon to edit
Purchase Requisition
Accessing Purchase Requisition History
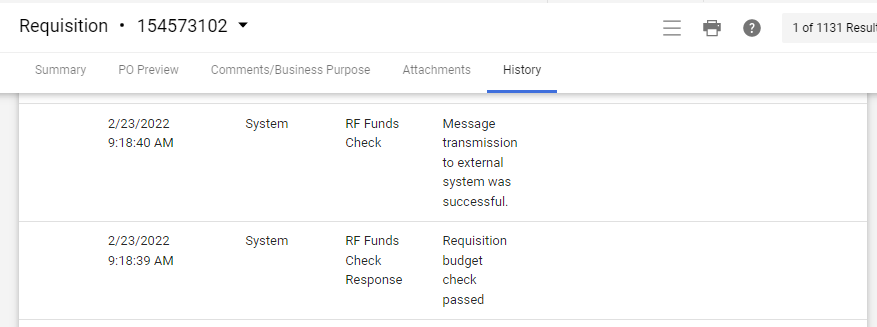
Through Orders & Documents, you can view the history of a Purchase Requisition (PR). History will show who created, approved, and changed the PR.
- In the quick search at the top of the page, choose Requisitions from the dropdown
menu and fill in any search terms (PR number, supplier name, product information)
and/or dates, and click the magnifying glass

Alternatively, you can: - Hover over the
 in the left menu, hover over search and then select Requisitions
- In the Search options, select Requisitions, fill in any search terms (PR number, supplier
name, product information) and/or dates, and click Go

If you are searching for your own Requisition, you can also: - Hover over the
 in the left menu, hover My Orders and then select My Requisitions
- In the list of results, click on the Requisition No. This will open the Requisition
and show information about the order

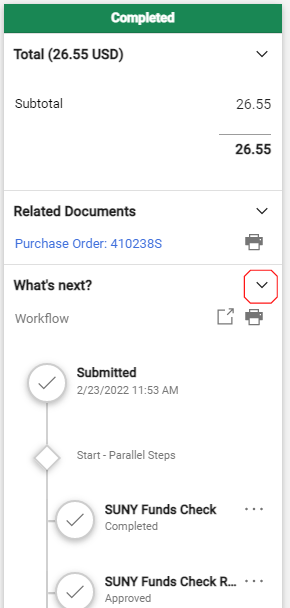
- In the left column, click the arrow next to What's Next? to show the dropdown. This
shows you what steps the Requisition is on or has completed
- Click on the History tab to see more details
- In the quick search at the top of the page, choose Requisitions from the dropdown
menu and fill in any search terms (PR number, supplier name, product information)
and/or dates, and click the magnifying glass
Approvals
Approvals and Purchase Requisitions (PR)
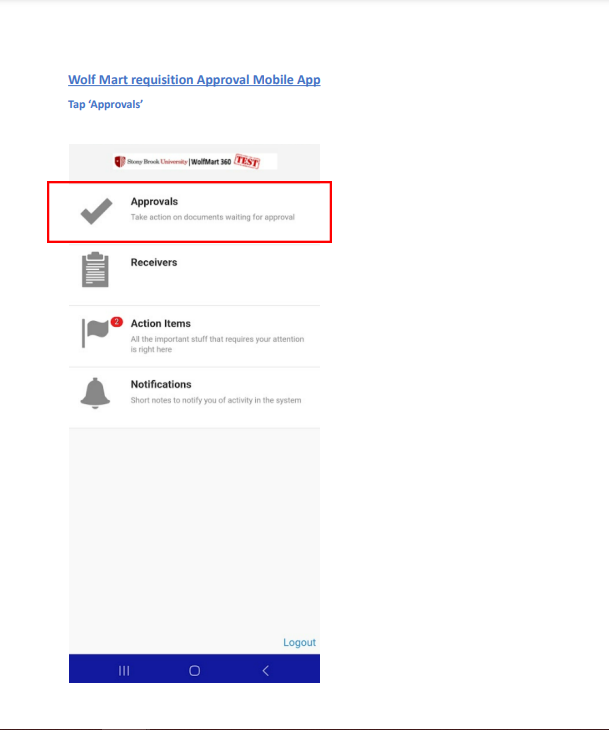
Approvals in Wolfmart allow approvers to work with Purchase Requisitions (PRs) to approve, make changes, return to requisitioner, or reject PRs.
Access Approvals
-
Click the flag icon in the top right corner to access pending approvals
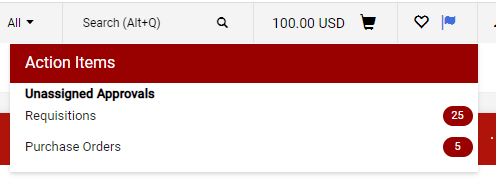
OR
-
Go to Orders >Approvals and select Requisitions to Approve or Purchase Orders to Approve

Approve a PR
-
From the Requisition Summary tab, look over the PR
-
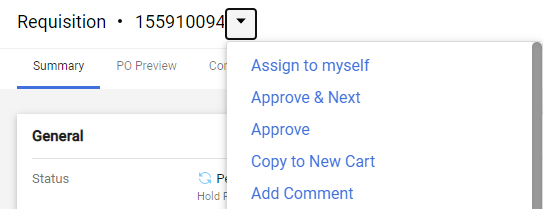
Any additional issues will display near the top in blue text. Address any issues by clicking the text. When there are no other issues, from the dropdown menu in the top right corner, select Approve
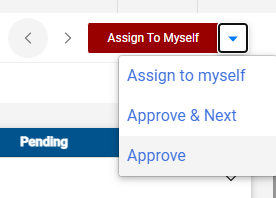
If you have multiple requisitions to approve, you can choose Approve & Next, which will automatically take you to the next approval
-
You can also access this menu in the dropdown at the top left corner of the screen, next to the requisition number
Make Changes to or Return a PR
-
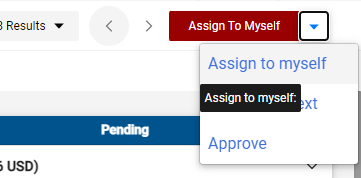
From the dropdown, select Assign to Myself
-
You will then have more options:
-
To return the PR to the requisitioner, from the dropdown, select Return to Requisitioner
-
To edit yourself, make any changes by clicking the pencil next to the section to change
-
To cancel the PR, select Reject Requisition
-
-
Purchase Order and Forms
Find a PO
-
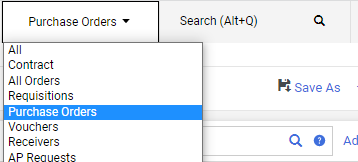
In the top bar, select Purchase Orders from the Quick Search dropdown and fill in any search terms (PO number, supplier name, product information) and/or dates
-
Or you can:
Hover over
 in the left menu and use the Quick Search or select All Orders
Alternatively, in the My Orders section next to the icon, click My Purchase Orders to view all

-
In the search results, view quick information on the PO's status in the Settlement Status* column

Statuses include: Complete, Pending, Returned, Rejected, Withdrawn
-
Access full PO information by clicking on the PO No

-
The PO information will display
-
Determining if a PO was Paid
Find out if a PO was paid in the Voucher tab:
- Find the PO (Click the bullet above if you need help)
- Click the Vouchers tab

- Next to each voucher number, you will see various information. Under Payment Status,
check the status of the voucher. Paid = PO has been paid; Payable = PO not yet paid
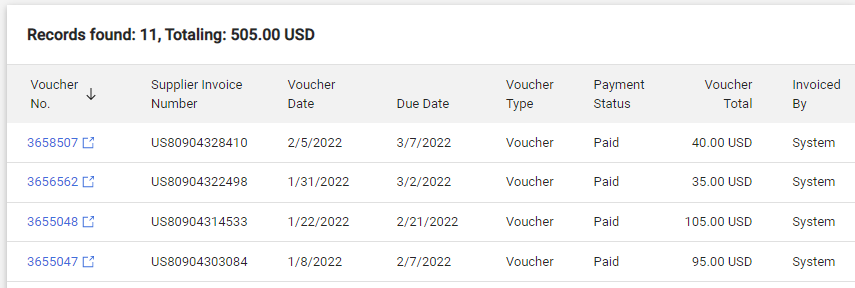
- Click on the Voucher No. for more information about the individual voucher
- In the Summary tab, find information on
- Note: Notes sometimes indicate whether PO is ok to pay (i.e., goods were received); can also indicate that full payment was received
- Payment Status again
- Payment Status Information: Shows when and how PO was paid (note that checks can take
7-10 days to reach vendors)
no value/Unknown = PO not yet paid
- Find the PO (Click the bullet above if you need help)
Finding Purchase Order Delivery Information
For many order delivered to Central Receiving, you can find out if they were delivered in the PO Receipts tab (receipt information isn't available for Services, Blanket Orders, Software or Desktop-delivery items).
- Find the PO (Click the first bullet in this section)
- Click the Receiver tab

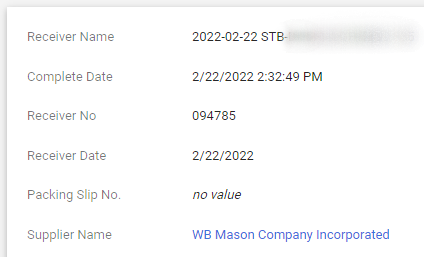
- Here, you can view information about the date and person who received the item.

- Click on the receiver number to see more detailed information about the delivery,
including address and exact delivery time
- Find the PO (Click the first bullet in this section)
Responding to Comments
For POs with no receipt information (e.g., Services, Blanket Orders, Software or Desktop-delivery items), communication with procurement about payment status is done through Comments. In comments, you can, for example, indicate that an order is ok to pay.
When procurement sends comments to you, you'll receive email notification, from which you can access comments in WolfMart.
Reply to a Comment
- Access Comments:
- From Email
- Click on the link in the email
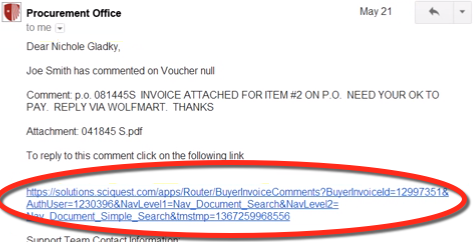
This will bring you to the correct Comments section in WolfMart
- Click on the link in the email
- From WolfMart:
- Find the PO (First bullet of this section)
- Click the Comments tab

- Find the PO (First bullet of this section)
- From Email
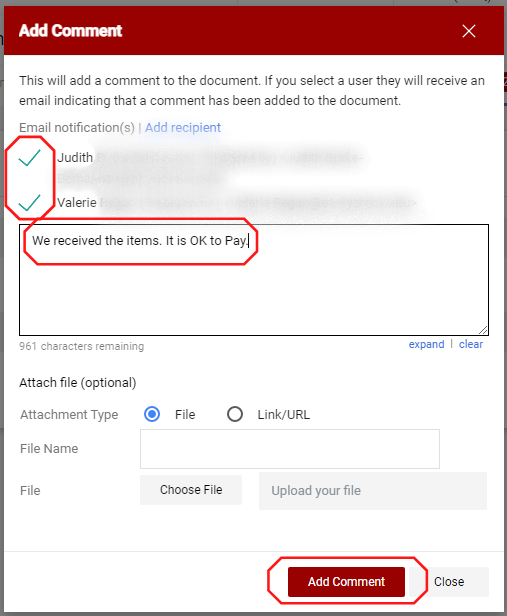
- Click Add Comment
- Alternatively, you can go to the dropdown menu next to the PO number and select Add
Comment

- Be sure the box(es) next to names/email address in Email notification(s) is checked
(this ensures that procurement sees your comment right away)1
- Type your comment (i.e., "We received the items. It is OK to pay") in the box
- Click Add Comment
- When attaching an invoice for payment through comments, be sure to send email notification
to the appropriate Accounts Payable contact for the funding source:
- State Funds: alfred.divenuto@stonybrook.edu
- Research Funds: william.lacascia@stonybrook.edu
- Instead of leaving a comment for an invoice, you can also email the PO number and attach the invoice in an email and send to accountspayable@stonybrook.edu
- Access Comments:
The Showcase Form Cheat Sheet and Purchasing with Forms have more information on choosing which form to use.
To download the Showcase Form Cheat Sheet,
- Click Training located on the top of Wolfmart pages
- Scroll down and click on Online Training.
- From there, you'll find the Showcase Form Cheat Sheet in the list of Resources
Forms, found at the very bottom on the home page, allow for additional types of purchasing in Wolfmart.

Use Blanket Order Request Forms to purchase goods over a specific period of time for contracted or established quantity/pricing within these limits:
- Each request is for a period of time (no one-time purchases)
- Each request is for a specific vendor not already included as a WolfMart Hosted or Punchout vendor
- Requests are for goods, not services (services must use the Service Contract Form)
- Each request must have supporting documentation (quotes, justification) attached
State Funded Blanket Orders:
- Estimated for entire fiscal year
- Submitted for each vendor separately
- Requests over $2,500 must follow appropriate SUNY Procurement procedures
- Automatically terminate on June 30th each yaer
Research Foundation Funded Blanket Orders:
- Submitted for each vendor separately
- Follow appropriate Research Foundation Procurement procedures
- Requests for $10,000 or more must provide a written justification to Procurement
- Order end dates must be on or before term date of designated award.
- Automatically terminate once the estimated encumbrance has been expended (at which point a new request must be submitted)
Here's how:
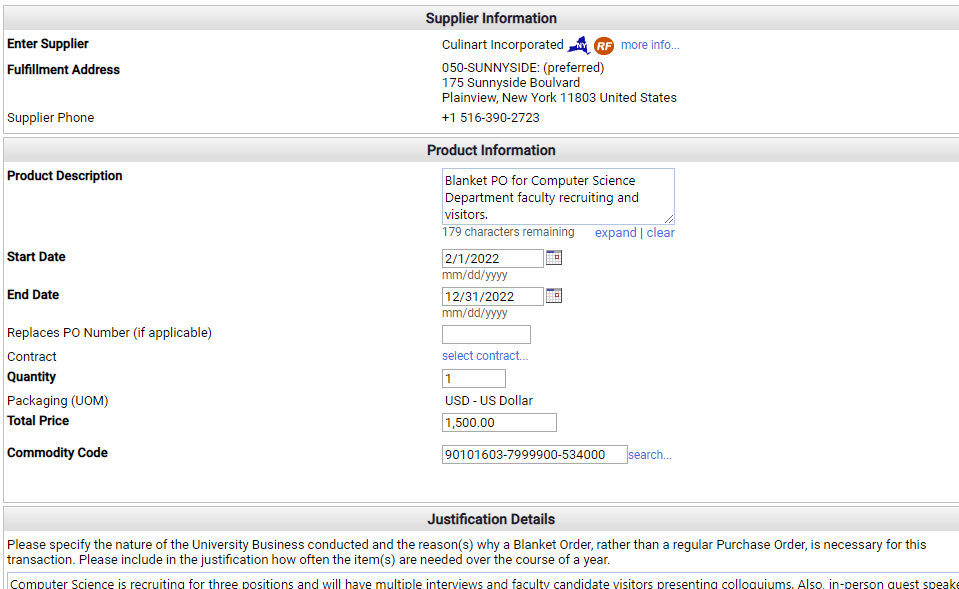
- In the Showcased Forms section, click Blanket Order Request Form
- Read the Blanket Order Request Instructions on the left side of the form
- Type the supplier name in the Enter Supplier box (or use supplier search) (Add a missing vendor)
- Complete product description, start date, and end date
- If there was a past Blanket Order PO, enter it next to Replaces PO Number
- Enter Quantity as 1 and complete Total Price
- For Commodity Code, click search... to find the appropriate commodity code
- Complete Justification details as per the instructions
- To add an attachment (e.g., quote or any documents required for purchase), click add
attachment...
- Scroll up to the top; under Available Actions, select Complete Form and Go to Cart
and click Go

- To make any changes to the form from your Shopping Cart, click the name of the form
- Continue with your order (click Assign Cart if you are a Shopper; click Proceed to Checkout if you are a Requester or Approver)
You will find the following instructions
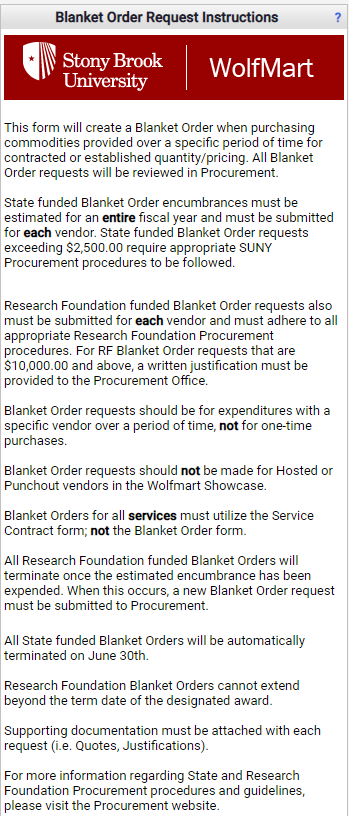
on the left side of the Blanket Order Request Form. Please read and follow these carefully:
This form will create a Blanket Order when purchasing commodities provided over a specific period of time for contracted or established quantity/pricing. All Blanket Order requests will be reviewed in Procurement.
State funded Blanket Order encumbrances must be estimated for an entire fiscal year and must be submitted for each vendor. State funded Blanket Order requests exceeding $2,500.00 require appropriate SUNY Procurement procedures to be followed.
Research Foundation funded Blanket Order requests also must be submitted for each vendor and must adhere to all appropriate Research Foundation Procurement procedures. For RF Blanket Order requests that are $10,000.00 and above, a written justification must be provided to the Procurement Office.
Blanket Order requests should be for expenditures with a specific vendor over a period of time, not for one-time purchases.
Blanket Order requests should not be made for Hosted or Punchout vendors in the Wolfmart Showcase.
Blanket Orders for all services must utilize the Service Contract form, not the Blanket Order form.
All Research Foundation funded Blanket Orders will terminate once the estimated encumbrance has been expended. When this occurs, a new Blanket Order request must be submitted to Procurement.
All State funded Blanket Orders will be automatically terminated on June 30th.
Research Foundation Blanket Orders cannot extend beyond the term date of the designated award.
Supporting documentation must be attached with each request (i.e. Quotes, Justifications).
For more information regarding State and Research Foundation Procurement procedures and guidelines, please visit the Procurement website.
Purchasing with a Single/Sole Source Form
Forms, found at the very bottom on the home page, allow for additional types of purchasing in Wolfmart.

Use Single/Sole Source Forms for single1/sole2 source orders of commodities, not services, 3 over $50,000 for State Funds or over $10,000 for Research Funds.
- In the Showcased Forms section, click Single/Sole Source Form
- Read the Single/Sole Source Form Instructions on the top of the form
- Type the supplier name in the Enter Supplier box (or use supplier search) (Add a missing vendor)
- Complete Catalog No., Product Description, Quantity, Unit Price, the Single or Sole
section, and the Establishment of Price Reasonableness
- Click add attachment... and attach the quote or written justification demonstrating
price reasonableness and justification of the vendor selection
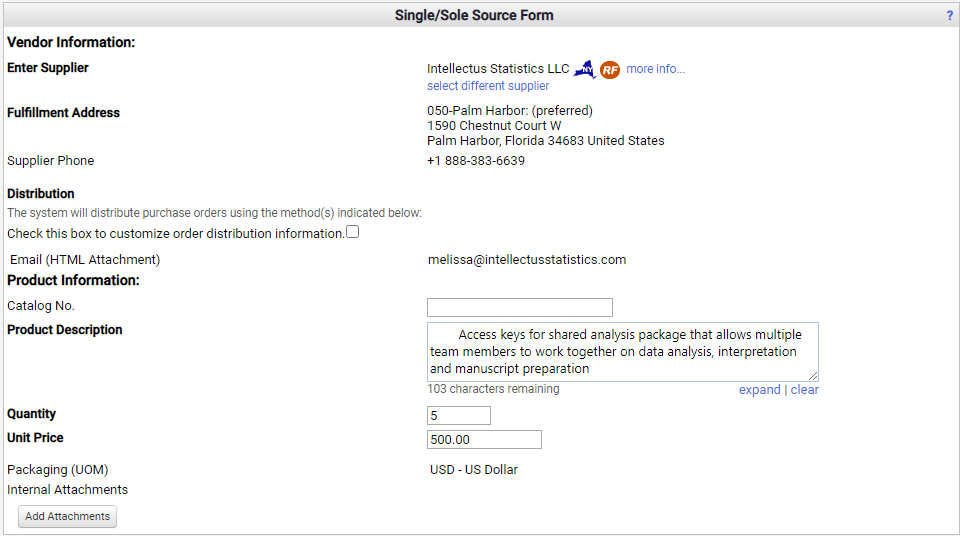
- Scroll up to the top; under Available Actions, select Add and go to Cart and click Go

- Continue with your order (click Assign Cart if you are a Shopper; click Proceed to Checkout if you are a Requester or Approver)
- Single: "Equipment is to be integrated with a currently owned system of the same manufacturer"
or "The supplies/materials are for an ongoing project, to change manufacturers will
have adverse effects"
- Sole: "The supplies/equipment/services are available only from one supplier"
- To order a service that is single/sole source, use the Service Request Form combined with a justification
- In the Showcased Forms section, click Single/Sole Source Form
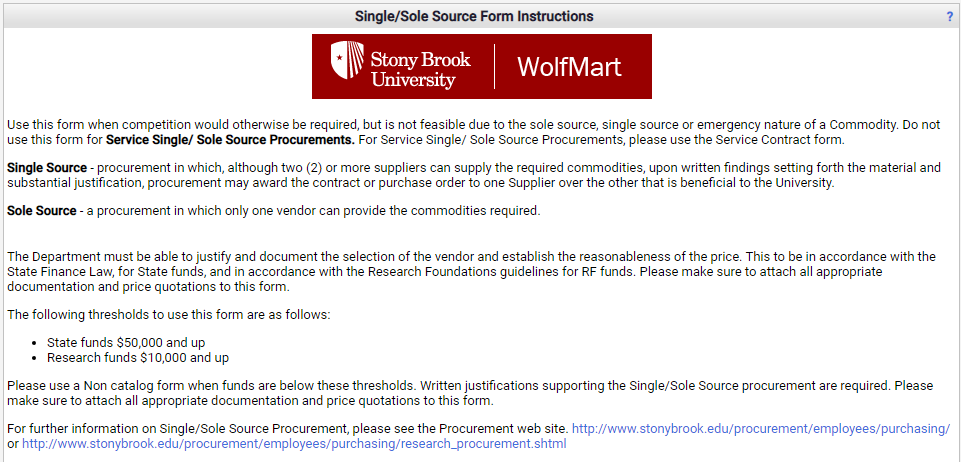
Single/Sole Source Form Instructions
You will find the following instructions on the left side of the Service Request Form. Please read and follow these carefully:
Use this form when competition would otherwise be required, but is not feasible due to the sole source, single source or emergency nature of a Commodity. Do not use this form for Service Single/ Sole Source Procurements. For Service Single/ Sole Source Procurements, please use the Service Contract form.
Single Source - procurement in which, although two (2) or more suppliers can supply the required commodities, upon written findings setting forth the material and substantial justification, procurement may award the contract or purchase order to one Supplier over the other that is beneficial to the University.
Sole Source - a procurement in which only one vendor can provide the commodities required.
The Department must be able to justify and document the selection of the vendor and establish the reasonableness of the price. This to be in accordance with the State Finance Law, for State funds, and in accordance with the Research Foundations guidelines for RF funds. Please make sure to attach all appropriate documentation and price quotations to this form.
The following thresholds to use this form are as follows:
- Research funds $10,000 and up
- State funds $50,000 and up
Please use a Non catalog form when funds are below these thresholds. Written justifications supporting the Single/Sole Source procurement are required. Please make sure to attach all appropriate documentation and price quotations to this form.
For further information on Single/Sole Source Procurement, please see the Procurement website: How to Buy or RF Purchasing
Forms, found at the very bottom on the home page, allow for additional types of purchasing in Wolfmart.

Use Service Contract Request forms for services, for example, maintenance agreements, repairs, software licenses, rental cars.
- In the Showcased Forms section, click Service Request Form
- Read the Service Request Form Instructions on the left side of the form
- Type the supplier name in the Enter Supplier box (or use supplier search); if doing
a bid, type bid in this field (Add a missing vendor)
- Complete Product Description, Quantity, Estimated Price, Commodity Code, any notes,
begin and end dates.
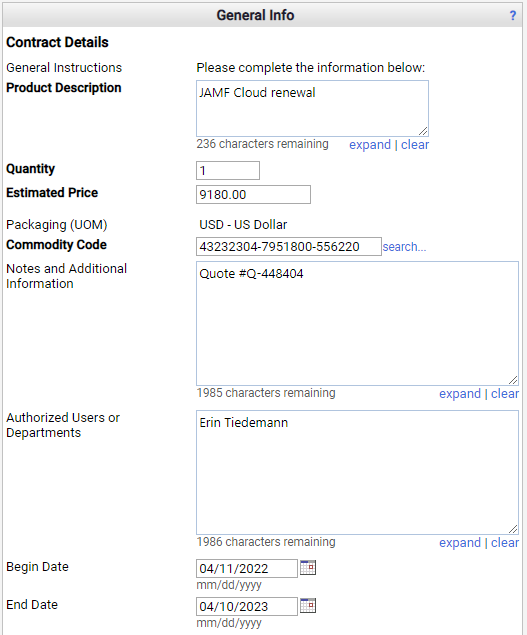
- When applicable, click to select contract...1
- For Internal Attachments, you can add documentation (e.g., OGS contract documentation,
vendor maintenance agreement, Scope of Work) by clicking Add Attachments

- Scroll up to the top; under Available Actions, select Complete Form and Go to Cart
and click Go

- Continue with your order (click Assign Cart if you are a Shopper; click Proceed to Checkout if you are a Requester or Approver)
- For example, select contract (e.g., Cxxxxx or Txxxxx) here when Procurement has bid out and established a formal contract for your department and you are funding the contract in subsequent years. Also, departments utilizing SUNY-wide CM contracts should indicate the contract number here.
- In the Showcased Forms section, click Service Request Form
Service Request Form Instructions
You will find the following instructions on the left side of the Service Request Form. Please read and follow these carefully:
This form is used to initiate a Service Request. After submitted, the form will be routed to Procurement for processing.
All Service Requests will require end users to enter a Cost Receipt to confirm that services have been rendered.
Forms, found at the very bottom on the home page, allow for additional types of purchasing in Wolfmart.

Use Non-Encumbered Payment Forms for these scenarios:
State and Research Foundation
- Federal, State or Local Government Payments
- Membership Fees up to $50,000
- Postage (Includes UPS and FedEx)
- Registration Fees
- Small Claim/Legal Payments
- Subscriptions
- SUNY Tuition/Overseas Academic Programs
- US Homeland Security Payments
Research Foundation
- Direct payment of vendor invoices up to $10,000 (RF only1)
Note that each non-encumbered payment form can only have one invoice.
- In the Showcased Forms section, click Non-Encumbered Payment Form
- Read the Non-Encumbered Payment Form Instructions on the top of the form
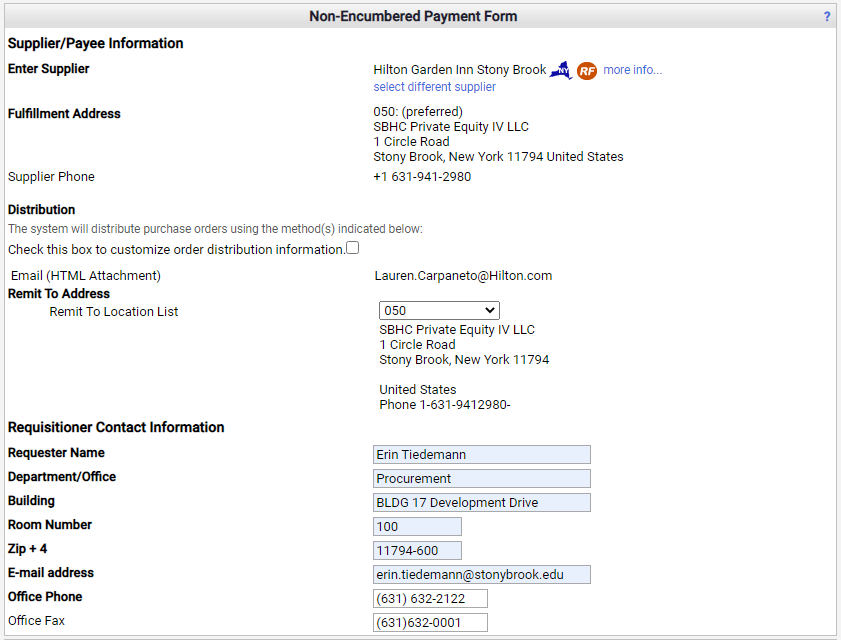
- Type the supplier name in the Enter Supplier box (or use supplier search) (Add a missing vendor)
- In the Non-Encumbered Payment Form section, complete these fields: Remit To Address,
Requester Name, Department/Office, Building, Room Number, Zip +4, E-mail address,
Office Phone, Office Fax:
- In the Invoice Description section, complete Supplier Inv#, Invoice Total, Voucher
Date, and Description/Justification/Purpose of Purchase
- For Commodity Code, click search... to find the appropriate commodity code
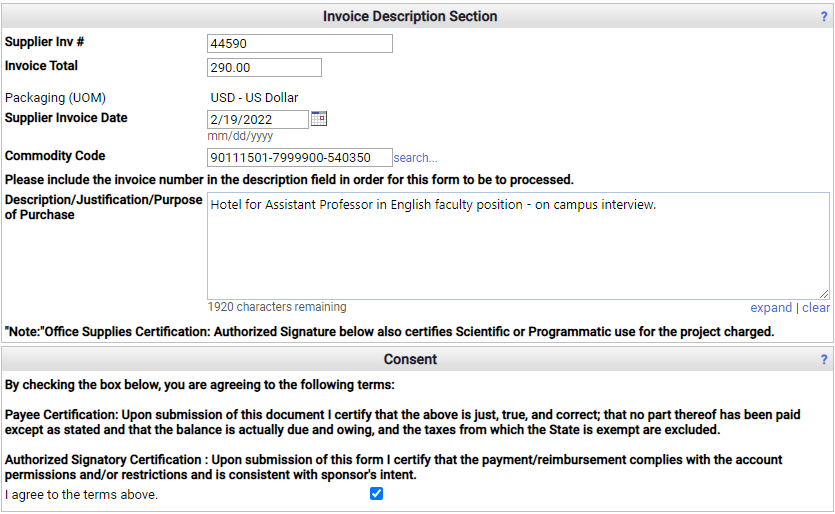
- Read the Consent section, and then check the box to agree to the terms
- Attach your invoice by clicking Add Attachments and choosing the file

- Scroll up to the top; under Available Actions, select Complete Form and Go to Cart
and click Go

- To make any changes to the form from your Shopping Cart, click the name of the form
- Continue with your order (click Assign Cart if you are a Shopper; click Proceed to Checkout if you are a Requester or Approver)
- State funded orders for commodities and/or services require purchase orders. Any State funded form including a vendor invoice for commodities and services will be returned to the department.
Non-Encumbered Payment Form Instructions
You will find the following instructions on the top of the Non-Encumbered Payment Form. Please read and follow these carefully:
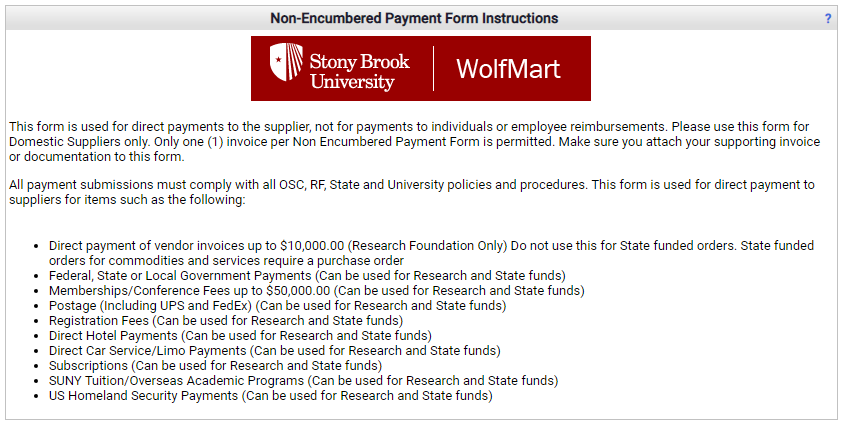
This form is used for direct payments to the supplier, not for payments to individuals or employee reimbursements. Please use this form for Domestic Suppliers only. Only one (1) invoice per Non Encumbered Payment Form is permitted. Make sure you attach your supporting invoice or documentation to this form.
All payment submissions must comply with all OSC, RF, State and University policies and procedures. This form is used for direct payment to suppliers for items such as the following:
- Direct payment of vendor invoices up to $10,000.00 (Research Foundation Only) Do not use this for State funded orders. State funded orders for commodities and services require a purchase order
- Federal, State or Local Government Payments (Can be used for Research and State funds)
- Memberships/Conference Fees up to $50,000.00 (Can be used for Research and State funds)
- Postage (Including UPS and FedEx) (Can be used for Research and State funds)
- Registration Fees (Can be used for Research and State funds)
- Direct Hotel Payments (Can be used for Research and State funds)
- Direct Car Service/Limo Payments (Can be used for Research and State funds)
- Subscriptions (Can be used for Research and State funds)
- SUNY Tuition/Overseas Academic Programs (Can be used for Research and State funds)
- US Homeland Security Payments (Can be used for Research and State funds)
